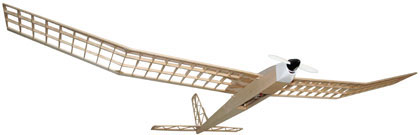
HobbyZone
Aerobird Xtreme / Firebird Commander 2

Upgrades and Modifications
(As Preparation to Finish my Goldberg Electra)
By MATT CARPENTER
www.skyrunner.com
Introduction
 I have always wanted an R/C airplane. Well actually, I have been building a Goldberg Electra Glider for over 15 YEARS!!! It has been in “skeleton mode” hanging
from various ceilings since 1993. Then, for our anniversary in 2006, my wife gave me a HobbyZone Aerobird
Xtreme (ABX)! Now did I marry the right person or what:-) Since it was an RTF (Ready To Fly) I simply charged the battery pack, walked down to the ballpark and threw
her in the air.
I have always wanted an R/C airplane. Well actually, I have been building a Goldberg Electra Glider for over 15 YEARS!!! It has been in “skeleton mode” hanging
from various ceilings since 1993. Then, for our anniversary in 2006, my wife gave me a HobbyZone Aerobird
Xtreme (ABX)! Now did I marry the right person or what:-) Since it was an RTF (Ready To Fly) I simply charged the battery pack, walked down to the ballpark and threw
her in the air.
All was going well for about 30 seconds when I ran out of park. I started turning gently to the left. Again, I was doing OK until she was coming towards me and I
wanted to straighten her out because she was now going to my right. I pushed my stick left and proceeded to spiral her down into the ground!
Lesson 1: When an R/C plane is coming towards you move the stick in the opposite direction you want to go!
A couple of flights later I managed a few big loops of the field before I stalled her coming out of a turn and took her into the ground again!
Lesson 2: Fly higher so you have time to recover!
Long story short, I was pretty much beating the hell out of my ABX. Fortunately, it was nothing that a little packing tape and glue could not fix. HobbyZone planes are amazing in that regard.
Before any permanent damage was done my wife, who was feeling a little guilty for getting me a level 3 plane, brought home a Firebird Commander 2 (FBC2) which is a level 1 plane.
I had a lot of fun with the FBC2. It was slow enough that I was able to think and react to my mistakes unlike the ABX which usually ended up in the ground before I even knew it was heading that way.
And while the FBC2 took a few hits, unlike the ABX it just was not heavy enough to do much damage to itself.
But once again I was my own worst enemy. I took her out for another flight on a day which was way too windy.
She got down-wind of me and every time I turned her in my direction to bring her back she would climb higher and get further down-wind.
She got away from me and I never did find her.
Lesson 3: Do not fly when there is a strong wind! Better yet, don’t fly when there is any wind, but if you do, keep your plane up-wind!
I loved that little plane enough that I bought another one. Soon I had enough confidence that I decided to give my ABX another try.
This time I drove to a bigger field and low and behold—success! I was actually flying without crashing. I even managed a few loops and stall turns and
ended with a halfway decent landing. Wow!!!
After taking her home and recharging the battery packs I headed right back out. However, the enemy within struck again. I got cocky and went back
to the smaller ballpark. While trying to avoid a tree I stalled her and she proceeded to nosedive into the road from rather high up. Game over!
The wing broke at the end of the carbon rod and when the landing gear folded up it broke the circuit board and therefore I had to buy a new fuselage.
Lesson 4: Big, or at least fast, planes need big parks! Actually, when starting out with any plane it is better to be in a big park! In fact, this should have been lesson one because most of my crashes were a result of trying to fly in too small of a park!
It should be noted that with infinite hindsight wisdom all four of these “lessons” are printed right in the instruction manual. Some are even printed right on the radio transmitter!
I got the bug!
 Fortunately, I had my new FBC2 so I was back in the sky in no time. Just as soon, my new ABX parts arrived so I now had two working planes. I loved the fact that I could just walk a block and fly the FBC2 in the little ballpark. At the same time, I liked my ABX because it could do some serious acrobatics.
Either way, I was flying and that got me thinking about the Electra hanging in the office. What would she look like in the air? There were still quite a few steps
to take to finish her but that is when I had an epiphany! I could do some modifications and upgrades to my HobbyZone planes that would give me the practice, and nerve, needed to finish and fly my Electra.
Modification/Upgrade Time
I had read a few posts on the RC Universe forums about converting an ABX to standard electronics.
For a radio I chose the Futaba 6EXA-FM which as a six channel radio would give me plenty of room to grow. I got the set-up for Park Flyers and Slow Fly models which
came with a R156F micro receiver and three S3108 micro servos. The price was $159.00 before a store discount which knocked off another $10.
Tip: Tie a piece of thread to the antenna before doing anything to your HobbyZone plane that requires removal of the electronics. It makes pulling it, or the new one, back through the boom a snap.
When I stripped my ABX I noticed that it’s circuit board was the same size as the FBC2’s. Talk about killing two birds with one stone:-)
I would simply upgrade my ABX to standard electronics and use it’s electronics in the FBC2 to make it a three channel! My awesome little FBC2 should then be a real
flyer as well.
In fact, I became so excited about upgrading the FBC2 to three channels that I started with her first!
Tail Modifications
The first step required to convert an FBC2 into a three channel was to modify the tail so that the “ruddervators” would go up and down.
As a two channel the ruddervators were designed to go up only which is how the plane went left/right. The throttle was used to make the plane go up/down. Well, I guess that means they were not ruddervators before and instead the plane had two rudders.
At any rate, the tail on an ABX is already designed for three channels so this modification is not needed. However, I may still do it because it is a much better hinge and I want the practice before I do this step to my balsawood Electra.
Tip: The stock tail on a Firebird Freedom (FBF) is already designed for 3 channels and looks like it would work on the FBC2 after slicing about an inch off the tips. However, I did not test this theory after I saw how inexpensive real hinges were.
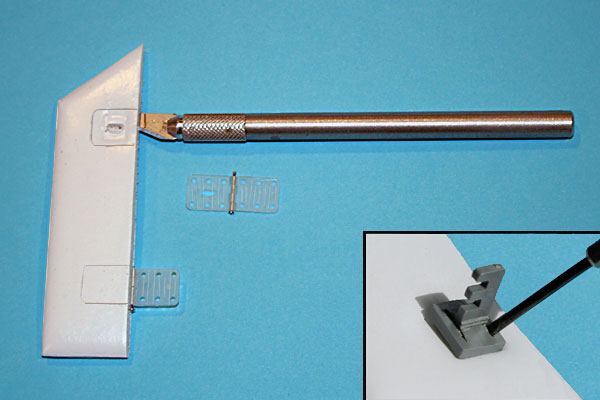
Modifying the FBC2 tail. The hardest part is getting the control horns off in one piece.
- Step 1: Cut the ruddervators off at the existing hinge.
- Step 2: Remove the control horns.
Tip: If you are easily discouraged, consider just picking up some new control horns and skip this step! Better yet, see the tip above about getting a FBF tail. Otherwise, I used a micro screwdriver to “click” the retainers off one notch at a time using all four corners. Therefore, it takes about twelve clicks per retainer—six per side. See the photo insert.
- Step 3: I scored lines into Du-Bro hinges I got from HobbyTown ($3.69 for 15) which gave them some “teeth” to bite into the wing parts and hold glue. You can see the score lines in the photo above.
Tip: Hold the exacto blade at a 45 degrees to make teeth similar to those found on the control horns.
- Step 4: I drilled two holes into the hinge then used an exacto to join the holes into one slot for the control horn. I could have put the hinge next to the existing control horn but I felt this extra step would make the set-up much stronger!
Tip: I drilled the holes in such a way that the horn would angle slightly toward the center aiming for the hole in the boom of the plane where the control lines come out. This helps prevent the horns from buckling.
- Step 5: Trace the hinges onto the tail parts and used an exacto to cut a slot for them.
Tip: I also drew a line on the exacto blade so that I would not cut too deep which again you can see in the photo above.
- Step 6: I coated the hinges with wood glue and inserted them into the slots. While I have some foam-safe CA I used wood glue so I would have enough time to get the alignment right. Also, I did not want to chance getting CA on the hinge joints.
- Step 7: Reinstall the control horns if step 2 went well. Otherwise, you will have to install new ones or upgrades.
Now I had to let the glue dry—one disadvantage to using wood glue. But that meant I had to find something else to do. Hey, I know...
Control System Upgrade
It seemed a shame to build such nice hinges and then revert to using the stock fish line / rubberband control system. Therefore, I opted to upgrade to a real pushrod system. I used the $5.95 Du-Bro 30" long .032 micro pushrod system for indoor and park flyers.
Not only is this a more responsive system, it would eliminate what I had read about as far as people losing control of their plane if (when) the rubberband broke.
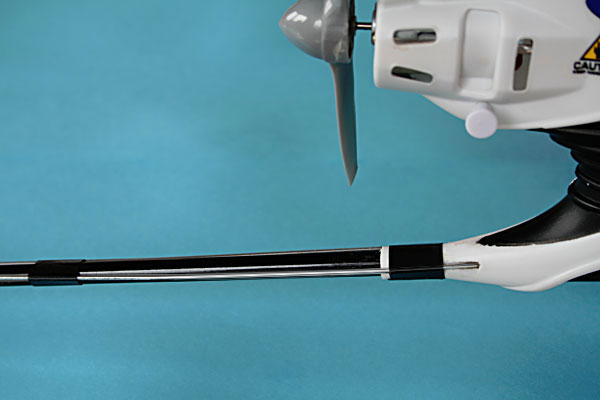
I tried to keep the pushrods as straight as possible. While some use zip ties to keep the pushrods in place, I opted to use electrical tape which to me has a much cleaner look.
In this photo you can see two of the three places where I taped the pushrods to the boom.

Again, from the inside you can see there is next to no bend in the pushrod sleeves. In fact, they are straighter than this when the pushrods are in them because in this photo they have fallen into the slot above the boom.
Tip: A quick squeeze of graphite into the sleeves before inserting the pushrods makes for one smooth setup:-)
Tip: Observant modelers will notice a small screw above to the boom which is a tip I read about to keep it from popping out of place on those “rough landings.”
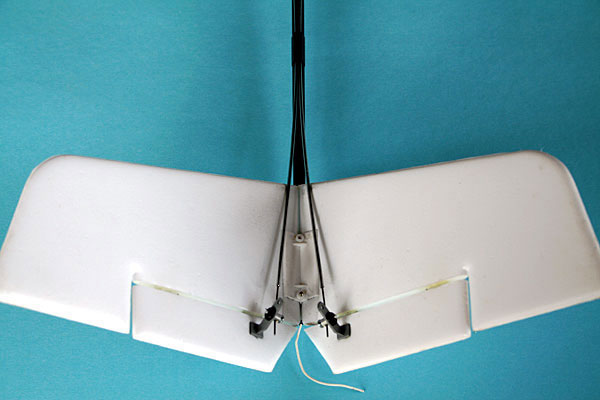
The finished tail with it’s awesome new hinges! Notice that I added new holes in the control horns so the pushrods would be much closer to the tail and give me more surface control range.
I can always back off the control range by programming my radio. Indeed, I use the radio’s dual range feature depending on if I want to fly aggressive or not.
You can also see the third place I taped the pushrods to the boom which is right over the hole where the fish line used to exit and where my pushrods still go their separate ways.
Tip: Since I was no longer using the hole in the boom I used epoxy to close it up which will hopefully add a little strength to an area that I have also read sometimes breaks.
After the upgrade I noticed that the servos were much quieter. In the stock system it seemed like they were always “buzzing” since they were fighting against the rubberband even when they were not
moving. I am guessing the upgrade will extend the life of my servos and should be less drain on the battery which could give me longer flight times.
Landing Gear Reinforcement
Even if you never crash your FBC2 (yea, right) the landing gear tends to get a little sloppy. This is because a thin piece of plastic is being subjected to the force of every landing and over time, or on any hard landing, it breaks and bends forward.
Here you can see how I reinforced the slot for the landing gear on the circuit board mount. I simply wedged a couple of pieces of Styrene between the lading gear slot and front mounting screw holes. A couple of drops of CA sealed the deal.
Tip: You don’t have to remove the circuit board to reinforce the landing gear but if you are going to be upgrading to standard electronics anyway it is a little easier to do with the board removed.
Standard Electronics Upgrade
I got to thinking that if I took the board out of my ABX to upgrade my FBC2 I would be without a plane to fly
if something went wrong. Therefore, I opted to put the standard electronics in the FBC2 first. Again, since the boards are the same size I can move the new board to the ABX later after I am sure it all works.
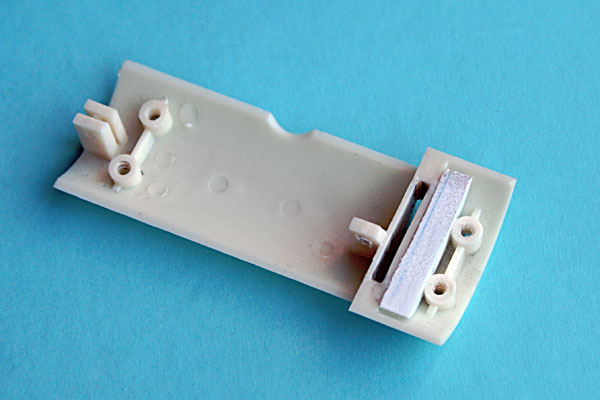
This is the new board which is made out of a piece of 1/16" Styrene. The board is about 1/4" shorter than the original and I could have made it even smaller.
However, I wanted to mount the servos high enough so that the end of the control arms would be at a height which would again minimize any bend
in the pushrods. For the same reason, I mounted the two servos from opposite sides of the board unlike the stock board which
had both servos mounted from the same side. Bottom line, from servo to tail there is very little bend in the pushrods.
Tip: Because the original circuit board was only 1/32" thick I used an exacto cut the Styrene a little thinner where
it goes into the plane’s stock mounting board on the rear so it would not break the mounting tabs. This was not an issue on the front of the
mounting board because there is only one tab. (See the photo in the section above on reinforcing the landing gear.)
This photo is looking at the receiver side of the new board. You can see I cut one of the corners off the board just to make it a little easier to slip in and out of the plane.
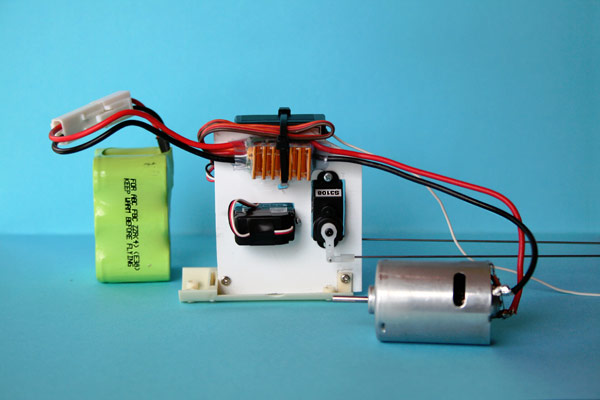
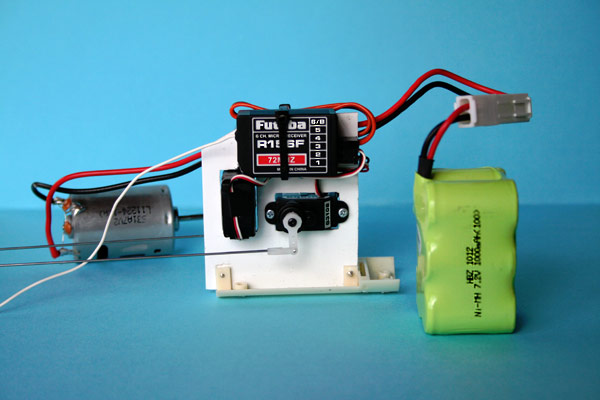
This is the Electronic Speed Control (ESC) side of the board. I used a GWS ICS480 20-Amp ESC which cost $14. I put double sided tape on the back of
it and the receiver and reinforced it all with a zip tie.
Tip: The ESC came with the heat sink detached but recommended that it be used for better efficiency.
The instructions did not say how to do it other than to cut away the existing shrink-wrap.
I just put a drop of CA on the FET and then attached the heat sink. I then used a hair dryer to shrink the provided piece of larger shrink-wrap over the whole ESC.
It only took a few seconds so there was no worries as far as damaging the circuit board.
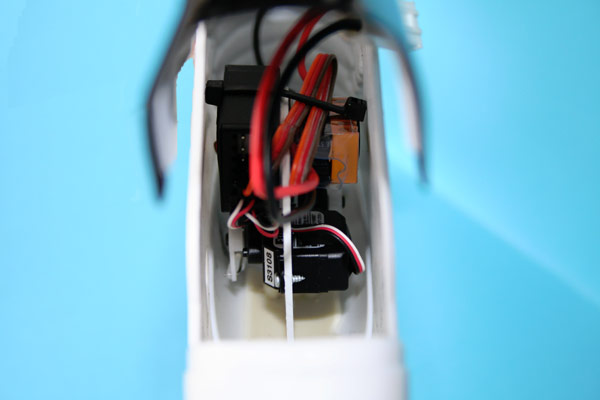
Here is a view inside the plane with the new board in place.
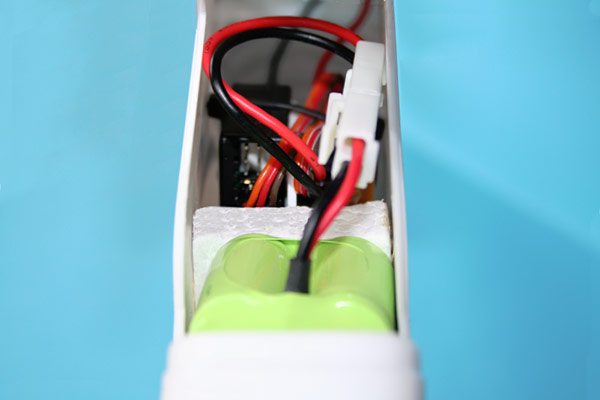
Here is the same view but with the Styrofoam and battery also in place.
More Power
I had read that upgrading from the stock ESC would provide more power. I can confirm that this is true, but I must admit I was surprised by how much more power.
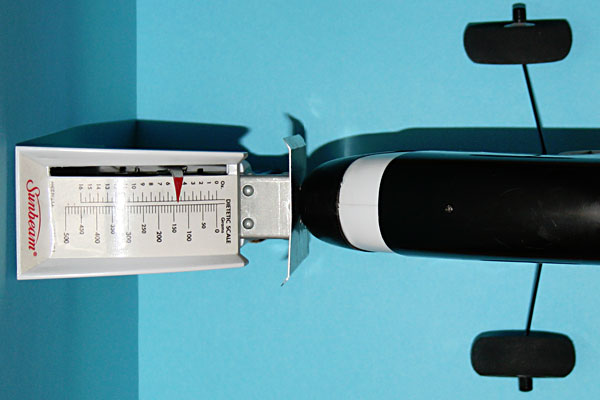
This is an overhead shot of my upgraded FBC2 pushing full throttle against a food scale with 135 grams of force. The stock FBC2 using the same battery only managed 100
grams. The actual numbers are a little higher but hard to determine because the scale would not zero while on it’s back. But it is the before / after difference that
counts and the difference was huge! Especially when you consider that my FBC2 at 490 grams (with battery) is only 20 grams heavier than a stock FBC2.
That translates into a 35% increase in power with only a 4.25% increase in weight—half of which went into strengthening the wing. (See below.)
More Power II
The above power boost came at some expense in the form of a major upgrade. There is another relatively simple procedure that can be done to give your
FBC2/ABX (or most planes with a brushed motor) a power boost at no cost. The procedure is called timing the motor. Since in these planes the motors push
the plane we want to reverse time the motor.
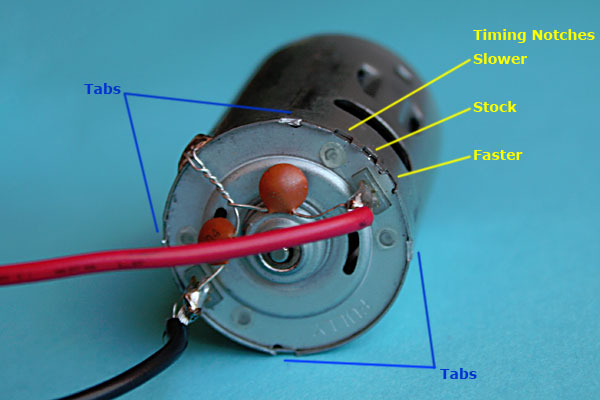
In a nutshell, there are three timing notches on the motor and it comes factory set to the middle, neutral position. By rotating the backplate clockwise (looking from the back)
the motor will run faster. To do the rotation you must bend back the four tabs (thee on an ABX) holding the motor together and pull the motor slightly apart.
I put the motor in a vice (not too tight) and using a hammer
I gently tapped on the tabs using a thin flat screwdriver. To make sure I was going in the right
direction I applied full throttle before rotating the backplate. Likewise, I applied full throttle with the backplate rotated in both directions. The difference in motor
speed at each notch is obvious! I then gently taped the four tabs (three on an ABX) back down to hold the motor together in the faster position.
Putting the plane through another “food scale test” revealed that it was now up to 150 grams of force. Between the new ESC and reverse timing the motor a 50% improvement in motor power had been achieved!!!
Tip: You should not have to unsolder anything because you only need to pull the motor apart a small amount to do the rotation.
At the same time, by pulling the motor apart a little you will not have to bend back the timing notches or melt away the plastic tab on an ABX as some recommend.
Tip: Running the motor faster will obviously drain the battery faster as well. Therefore, I don’t use full throttle too much but it sure makes for faster take-offs and climbs!
Tip: Speaking of running the motor faster, now is a good time to put a drop or two of lightweight oil on the bearings on both ends
of the motor. However, you can do this at any time because you do not need to take the motor apart. Indeed, this can be done while the motor is still in the
plane with the proper applicator or by putting a drop of oil on a toothpick!
Radio Setup
As any R/C person knows, today’s computer radios are just a dream! After I selected V-tail mixing and used the servo reversing feature on all three channels it did exactly as was expected.
With one exception—the rudder control was on the left stick! This meant that my throttle and rudder (left/right) would be on the left stick and my elevator (up/down) would be on
the right stick. Not really a problem (that is the way most people fly) except that the HobbyZone planes come with a sliding throttle on the left and one stick on the right which controls both the rudder and elevator (ruddervators) and I was already used to that setup.
Tip: A quick glance at my radio’s instructions revealed that I could simply switch it from Stick Mode 2 to Stick Mode 4 which
swapped control of the ailerons (which I was not using) and rudder to the opposite sticks. Perfect!
Tip to the Tip: I then got to thinking that this could mess me up down the road with any future planes that did not have a V-tail. So I hooked the servos up to the receiver using channel
1 (aileron) and channel 2 (elevator) instead of channel 2 (elevator) and channel 4 (rudder). Next, I
turned off V-tail mixing and turned on Elevon mixing which was intended for “flying wing” models.
I was then able to put my radio back into the more standard Stick Mode 2.
The end result was that I was now perfectly simulating the radios that came with the planes!
Time to Fly
The first flight was a very good flight. Well actually, it was freaking awesome because I now had much more control of my FBC2 since she was now a three channel plane!
However, I had to give her quite a bit of down trim to make her fly level. Further, although the down trim leveled her out, she just seemed “off” and I suspected she was now tail heavy.
When I got her home and weighed her she came in only 10 grams heavier than she came stock. Indeed, my board with two servos weighed about the same as the standard
board with just one servo. However, it was clear that the pushrods had
added a little weight and worse, since that weight was out on the tail, the center of gravity (COG) had been moved back quite a bit. No problem! I simply cut some of the Styrofoam
out from in front of the battery and moved it forward about 1/4". Now my COG was back to 1.75" from the leading edge of the wing just like before the conversion.
Tip: Check the COG before you fly—that could have been a real disaster!
Time to Fly II
WOW!!! My FBC2 now rocks! Loop after loop after loop:-) And they are much tighter loops than I can do with my ABX. Tail stales, the whole nine yards—she is like a baby ABX that I can fly in a little park!
And again, she has the added advantage of being so light that every little “rough landing” does not damage her. In fact, I can’t believe how long this tail has lasted!
I think the rubberband control systems on the stock planes put a lot of stress on the tails so that when the planes hit the ground the tails tend to buckle or at least wrinkle.
Indeed, I had seen wrinkles appear even when I knew the tail never touched the ground.
Wing Reinforcement
Speaking of buckling, I got to worrying that the stock FBC2 wing was not designed for the acrobatics I was putting it through.
Therefore, I cut 5" off of the carbon rod from my broken ABX wing and installed her in the FBC2 wing. Of course, carbon rods are available at hobby shops as well for about $5.
I first traced the carbon rod onto the wing. I then used the outline as a guide to cut away the wing’s thin plastic coating with an exacto.
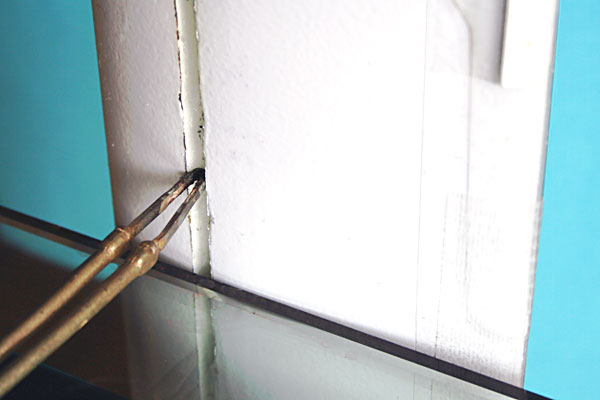
I then ran the wing up against a soldering iron which left a round channel in the Styrofoam perfect for the carbon rod.
Tip: I hung the tip of the soldering iron over the edge of a table at the proper depth and used the table as a guide to run the wing up against.
This allowed me to make a channel that was smooth and even and I didn’t have to worry about burning through the wing.
Tip: It doesn’t take much heat to melt Styrofoam. As I moved the wing over the soldering iron I cycled it on and off to keep it hot but not red hot.
Next, I ran a quick line of glue down the channel with a hot glue gun and quickly inserted the carbon rod before the glue could dry. Finally, I put tape over the whole thing just
as was done on the ABX.
The finished carbon reinforced wing which is now very stiff and strong!
You can also see that I plugged the hole were the Anti Crash Technology (ACT) sensor used to be—I am the ACT now:-)
Tip: You will also notice in the photo that I taped small pieces of Styrene to the leading and trailing edges of the wing to keep the rubberbands from warping it.
Tip: I put the larger wheels of my crashed ABX on the FBC2’s landing gear which stopped most of the little flips that were occurring when landing in the grass.
The above modifications added another 10 grams to the weight of the plane but that seemed like a good tradeoff.
Wrap-up
Was it worth it? Oh, yes! My FBC2 will literally fly circles around a stock FBC2! Bottom line, I now have a very nice little three channel plane that replacement
parts are readily available for and are relatively inexpensive.
Now some may question the logic of upgrading an FBC2 to this extent but remember this was done mostly as a learning project to finish off my Electra.
I needed a radio for her no matter what! However, most of the modifications mentioned above cost little if anything. Put simply, there are a lot of
options to choose from depending on how much time and money you want to sink into your plane.
At any rate, I am so happy with my FBC2 it may be a while before I get around to upgrading my ABX. No matter, the steps are almost exactly the same. On that note, I may just spend $60 for a flight pack (servos, receiver and ESC) so I can keep both planes going... It never ends does it?
But you will have to come back another day to see what happens because I am out flying:-)
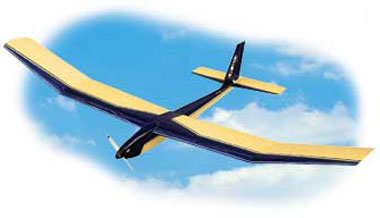
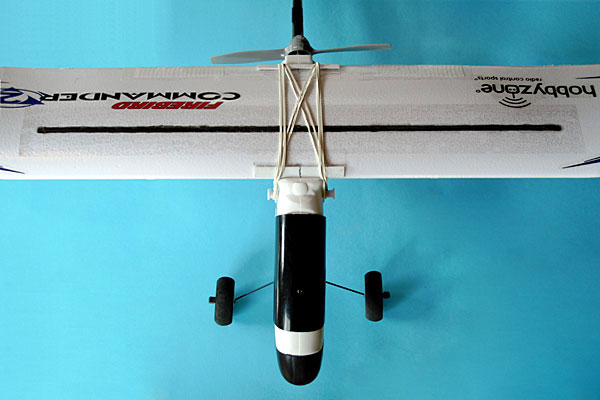
Modified three channel Firebird Commander 2 in flight.

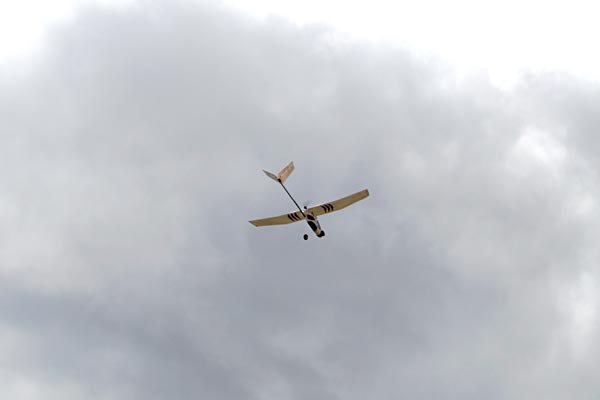
Here she is with the Garden of the Gods and Pikes Peak in the background.